Senin, 18 Maret 2024

 Pembangkit Listrik Tenaga Surya Sebagai Sumber Energi Utama


I. Pendahuluan


1.1 Latar Belakang

   - Paparan masalah

   - Alasan pentingnya penggunaan energi terbarukan

   - Permasalahan lingkungan akibat penggunaan energi fosil


1.2 Perumusan Masalah

   - Bagaimana pembangkit listrik tenaga surya dapat menjadi sumber energi utama?


1.3 Tujuan

   - Menganalisis peran energi surya sebagai sumber energi utama.

   - Menyediakan informasi tentang manfaat dan tantangan dalam mengadopsi energi surya sebagai sumber energi utama.


II. Tinjauan Pustaka


2.1 Konsep Pembangkit Listrik Tenaga Surya

   - Prinsip kerja pembangkit listrik tenaga surya

   - Teknologi yang digunakan dalam energi surya

   - Komponen-komponen dalam sistem listrik tenaga surya


2.2 Keunggulan dan Manfaat Energi Surya

   - Energi bersih dan ramah lingkungan

   - Mengurangi emisi gas rumah kaca

   - Dapat diakses secara luas di seluruh dunia

   - Biaya operasional yang rendah


2.3 Tantangan dalam Penerapan Pembangkit Listrik Tenaga Surya

   - Biaya investasi yang tinggi

   - Ketidakstabilan cuaca dan ketersediaan sinar matahari

   - Pemanfaatan lahan yang luas


III. Metodologi


3.1 Pendekatan dan Rancangan Penelitian

   - Metode penelitian yang digunakan

   - Teknik pengumpulan data


3.2 Sumber Data

   - Data primer dan sekunder

   - Sumber data yang digunakan dalam penelitian


IV. Analisis Data


4.1 Manfaat dan Potensi Pembangkit Listrik Tenaga Surya

   - Kontribusi energi surya terhadap keberlanjutan lingkungan

   - Potensi pemanfaatan energi surya sebagai sumber energi utama


4.2 Tantangan dan Strategi Mengatasi Kendala

   - Upaya mengatasi biaya investasi tinggi

   - Strategi mengatasi ketidakstabilan cuaca


V. Kesimpulan dan Rekomendasi


5.1 Kesimpulan

   - Pentingnya penggunaan pembangkit listrik tenaga surya sebagai sumber energi utama

   - Manfaat dan potensi energi surya dalam pemenuhan kebutuhan energi masyarakat


5.2 Rekomendasi

   - Langkah-langkah kebijakan untuk meningkatkan adopsi energi surya sebagai sumber energi utama

   - Program pemerintah yang mendukung pengembangan energi surya


VI. Daftar Pustaka


VII. Lampiran


Catatan: Kajian ini dapat diperluas dengan informasi lebih rinci, data dan analisis yang mendalam, serta studi kasus atau contoh implementasi pembangkit listrik tenaga surya sebagai sumber energi utama di negara atau daerah tertentu.
Rabu, 27 Juli 2016

Cara memunculkan compliance test ubnt

Complient Test ini diperlukan untuk mempermudah saat melakukan pointing. Karena saat ini sudah banyak sekali jaringan wireless bertebaran di kota- kota yang berdampak pada radio kita interfensi.
Untuk mengatasi masalah tersebut kita dapat menggunakan frekuensi tinggi atau pun rendah, setelah itu baru kita dapat melakukan pointing dan pemilihan frekuensi terbaik yang tidak melanggar aturan khusus untuk frekuensi jaringan 5Ghz.

Langkah pertama download dulu aplikasi Putty disini

Selanjutnya jika radio masih menggunakan ip standar ubnt yaitu 192.168.1.20
buka aplikasi putty dan masukkan host : 192.168.1.20 Port : 22
Untuk akses pertama awalnya ssh akan ada pesan popup, klik YES
Kemudian login menggunakan username dan password default ubnt jika belum diganti.
Selesai login, ketik perintah seperti dibawah, :
touch /etc/persistent/ct  (copy paste saja)
save
reboot
Setelah proses selesai maka radio akan restart. Tunggu hingga beberapa detik sampai hidup kembali. Silahkan login melalui browser dan lihat pada pilihan Countrynya

Kamis, 21 Juli 2016

cara install drop bear

Dropbear adalah SSH software atau perangkat lunak yang dibuat dan ditulis olehMatt Johnston. Dropbear bisa digunakan sebagai alternatif OpenSSH. Pada saat running penggunaan memori pada Dropbear relatif lebih rendah sehingga bisa berjalan lebih ringan pada server SSH di bandingkan dengan memakai OpenSSH.
Berikut ini adalah cara install Dropbear SSH pada Ubuntu Server 14.04 64 bit, untuk Debian langkah-langkahnya kurang lebih sama,
1. Pastikan port 443 tersedia
Karena port 443 akan kita gunakan pada Dropbear. Jika pada OpenSSH sudah menggunakan port itu, silahkan anda ganti/disable terlebih dahulu.
2. Update ubuntu dengan perintah
apt-get update
3. Install Dropbear dengan perintah
apt-get install dropbear
4. Atur konfigurasi untuk port Droppbear
nano /etc/default/dropbear
selanjutnya edit ganti pada bagian ini
NO_START=1
DROPBEAR_PORT=22
DROPBEAR_EXTRA_ARGS=
menjadi
NO_START=0
DROPBEAR_PORT=443
DROPBEAR_EXTRA_ARGS="-p 443"
simpan dan keluar dari editor
5. Start Dropbear dengan perintah
service dropbear start
6. Cek port pada Dropbear, apakah sudah running
netstat -nlpt | grep dropbear
Jika sudah berjalan hasilnya
tcp        0      0 0.0.0.0:443             0.0.0.0:*               LISTEN      4719/dropbear
tcp6       0      0 :::443                  :::*                    LISTEN      4719/dropbear
Untuk mencobanya anda bisa mulai login ke SSH dengan menggunakan port 443.

Cara install vps di ubuntu server

Dalam rangka untuk menjalankan VPS anda sebagai VNC Anda harus memiliki versi desktop Ubuntu. Versi server yang mungkin anda menjalankan ada yang hilang beberapa fitur yang diperlukan.
Pada server yang anda jalankan, ketikan perintah berikut untuk menginstal versi desktop:
sudo apt-get install ubuntu-desktop
Sementara Anda menunggu ini untuk menginstal, silakan men-download versi terbaru dari TightVNC (gratis).
Setelah selesai menginstal desktop, pastikan GNOME sudah terinstal dan dikonfigurasi:
sudo apt-get install gdm
sudo /etc/init.d start /gdm
sudo dpkg-reconfigure xserver-xorg
Dalam rangka untuk kontrol secara remote, Anda perlu menginstal VNC server pada Ubuntu Anda. Kita akan menggunakan TightVNC (install VNC di server Anda dan komputer Anda).
Langkah ini akan menginstal TightVNC pada server:
sudo apt-get install tightvncserver
Anda sekarang dapat memulai VNC: (perhatikan: Pastikan Anda membuat password dan mengingatnya ketika diminta, maksimum password adalah 7 karakter)
vncserver:1-geometri 1024-768-depth 16-pixelformat rgb565
Jika Anda lupa password:
vncpasswd
Sekarang mematikan VNC:
vncserver -kill :1
Sekarang kita akan mengkonfigurasi desktop yang menggunakan GNOME. Buka file startup:
sudo nano ~/.vnc/xstartup
Dan tambahkan baris ini di bagian bawah:
gnome-session &
restart server Anda:
sudo reboot
Jalankan VNC lagi:
vncserver: 1-geometri 1024-768-depth 16-pixelformat rgb565
Semua request VNC akan akan datang dengan port #590. Nomor terakhir disediakan untuk nomor desktop yang Anda tetapkan. Kita menggunakan 1 (:1) jadi kita hanya perlu membuka 5901. Jika kita ingin memulai dengan server lain (:2) maka kita perlu membuka port 5902.
Pada Windows bisa membukanya dengan menggunakan TightVNC Viewer. Atur Host ke IP server Anda. Mengatur Tampilan ke 1 (:1).
Masukkan kata sandi yang Anda set ketika Anda mulai server dan terhubung.

cara install ubuntu server

Tutorial Cara Mudah Install Linux Ubuntu Server 12.04 LTS

Pada dasarnya instalasi Ubuntu Server dengan versi desktop sama mudahnya. Hanya saja pada versi server kita menggunakan antarmuka berbasis teks, tidak seperti versi desktop yang menggunakan GUI. Sehingga mungkin agak terlihat menyeramkan untuk pengguna Linux pemula. Instalasi server juga perlu mempertimbangkan layanan-layanan apa saja yang nantinya diaktifkan di server tersebut. Selain itu instalasi server juga tidak disarankan menggunakan satu partisi untuk semua file system.

Tutorial Ngoprek kali ini akan membahas cara mudah instalasi Ubuntu Server 12.04 LTS. Instalasi tidak dilakukan di atas server fisik melainkan menggunakan virtual machine di atas Virtualbox. Untuk itu siapkan terlebih dahulu sebuah virtual machine baru. Atur juga virtual machine ini untuk boot menggunakan CD instalasi Ubuntu Server 12.04. Setelah itu, ikuti langkah-langkah berikut ini.

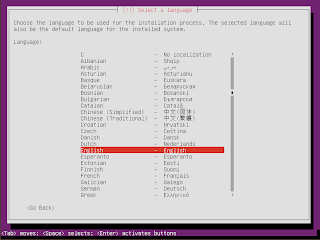
Di awal proses boot menggunakan CD instalasi, pilih bahasa yang akan digunakan.

Kemudian pilih Install Ubuntu Server di tampilan menu GRUB.

Selanjutnya pilih bahasa yang akan digunakan di sistem yang akan di-install.

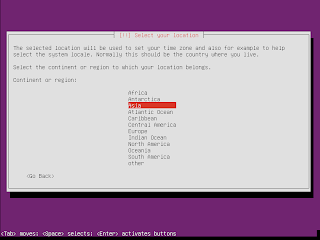
Untuk pilihan negara, Indonesia tidak terdapat di daftar paling depan sehingga kita harus memilih other.

Lanjutkan dengan memilih benua Asia.

Setelah itu barulah kita dapat memilih Indonesia.

Untuk pengaturan locales (mata uang, waktu, dkk) kita menggunakan pilihan United States.

Pada pengaturan keyboard kita akan memilih sendiri jenis layout dari daftar yang ada. JawabNo pada pertanyaan ini.

Pilih English (US) untuk Country of origin for the keyboard.

Pilih English (US) juga untuk Keyboard Layout.

Proses memuat komponen-komponen lain akan berlangsung beberapa saat, tunggu hingga selesai.

Installer Ubuntu akan berusaha untuk melakukan konfigurasi jaringan dengan mencari keberadaan DHCP server. Jika tidak menemukan layanan ini akan ada pesan gagal, tidak perlu khawatir pilih saja Continue.

Kita juga dapat mengatur jaringan secara manual, namun untuk mempersingkat waktu kita akan melewatkannya. Pilih Do not configure network at this time.

Tentukan nama host untuk server yang akan di-install Ubuntu Server 12.04 LTS.

Masukkan nama lengkap dari user yang akan menggunakan server ini.

Lalu masukkan juga user name-nya.

Selanjutnya tentukan password untuk user di atas. Password yang baik setidaknya terdiri dari 8 karakter yang disusun oleh alfabet, angka, dan tanda baca.

Verifikasi password ini dengan memasukkan kembali kata laluan yang sama persis.

Ubuntu mempunyai fitur untuk mengenkripsi direktori home milik user, namun sebelum kita menggunakannya. Pilih No untuk pertanyaan Encypt your home directory?

Pada pengaturan zona waktu, pilih salah satu sesuai dengan letak geografis server. Indonesia terdapat tiga pilihan, Jakarta untuk WIB, Pontianak dan Makassar untuk WITA, dan Jayapura untuk WIT.

Partisi sebaiknya dilakukan secara manual. Namun dalam tutorial ini kita akan memilih secara otomatis menggunakan pilihan Guided - use entire disk.

Pilih hard disk yang akan digunakan untuk instalasi.

Konfirmasi pembuatan partisi pada hard disk yang kita pilih tadi dengan memilih Yes.

Instalasi sistem dasar akan berlangsung beberapa saat.

Pilih cara untuk melakukan update pada Ubuntu Server ini. Jika tidak terhubung ke Internet, sebaiknya pilih No automatic update. Nantinya kita dapat melakukan update secara manual.

Tentukan perangkat-perangkat lunak apa saja yang akan dipasang secara otomatis selama proses instalasi. Untuk mempersingkat waktu, usahakan untuk memilih beberapa saja. Nantinya kita dapat melakukan instalasi setelah sistem selesai dipasang.

Instalasi perangkat lunak akan berlangsung beberapa saat. Tunggulah hingga selesai.

Pilih Yes untuk memasang boot loader GRUB di MBR (Master Boot Record).

Instalasi sudah selesai, pilih Continue untuk reboot sistem dan masuk ke Ubuntu Server hasil instalasi.

Masuklah menggunakan user yang kita buat tadi.

Server baru kita siap digunakan. Walaupun proses instalasi Ubuntu Server 12.04 LTSdalam tutorial ini tampak sangat panjang, sebenarnya waktu yang dibutuhkan untuk menyelesaikan seluruh proses ini lebih cepat dari yang kita bayangkan.

Jumat, 17 Juni 2016

Cara menghapus aplication di Ubuntu

Cara menghapus aplication di Ubuntu

If you have an idea of what you want to uninstall, but you don’t know the exact name, see our article about finding out exact package names in Linux. You can also use the “dpkg” command to see a list of all installed packages on your computer, press “Ctrl + Alt + T” to open a Terminal window. Type the following command at the prompt and press “Enter”.
dpkg --list
NOTE: There are two dashes before “list”.
01_dpkg_list_command
Scroll through the list of installed packages in the Terminal window to find the one you want to uninstall. Note the full name of the package.
02_gimp_in_list
To uninstall a program, use the “apt-get” command, which is the general command for installing programs and manipulating installed programs. For example, the following command uninstalls gimp and deletes all the configuration files, using the “--purge” (there are two dashes before “purge”) command.
sudo apt-get --purge remove gimp
Enter your password when prompted and press “Enter”.
NOTE: The password does not display as you type it. However, you can choose to display asterisks as you type the password.
03_uninstalling_gimp_with_purge
The uninstallation process begins and a summary of the actions to be taken displays. When asked if you want to continue, type a “y” and press “Enter”.
04_do_you_want_to_continue
The installation process continues. When it’s done, type “exit” at the prompt and press “Enter” to close the Terminal window, or click the “X” button in the upper-left corner of the window.
05_closing_terminal_window
If you don’t want to remove the configuration files, simply leave out the “--purge” command, as shown in the following command.
sudo apt-get remove gimp
06_uninstalling_gimp_without_purge
As discussed in this article, programs installed in Linux depend on other packages to function. When you uninstall a program, there may be packages that the uninstalled program depended upon that are no longer used. To remove any unused packages, use the “autoremove” command, as shown in the following command.
sudo apt-get autoremove
07_running_autoremove_command
You can combine the two commands for removing a program and removing dependencies that are no longer being used into one, as shown below (again, two dashes before “auto-remove”).
sudo apt-get purge --auto-remove gimp
08_using_one_command_to_autoremove
If you’re short on space, you can use the “clean” command to remove downloaded archive files, as shown below.
sudo apt-get clean
This command removes the aptitude cache in “/var/cache/apt/archives”. When you install a program, the package file is downloaded and stored in that directory. You don’t need to keep the files in that directory. However, the only drawback of deleting them, is that if you decide to install any of those programs again, the packages would have to be downloaded again.
09_cleaning_apt_cache
The “apt-get” is a handy tool that makes downloading, installing, and uninstalling programs quick and easy. For more information about using the “apt-get” command, type “apt-get” at the prompt and press “Enter”.

Cara Install Server Radio Online di Ubuntu Server

Cara Install Server Radio Online di Ubuntu Server

This tutorial describes how to set up an audio streaming server with Icecast2. In order that Icecast2 can stream audio to listeners we install Ices2. Ices2 is a program that sends audio data to an Icecast2 server to broadcast to clients. Ices2 can either read audio data from disk (Ogg Vorbis files), or sample live audio from a sound card and encode it on the fly. In this article we will let Ices2 read .ogg files from the local hard disk.
I do not issue any guarantee that this will work for you!

1 Preliminary Note

As mentioned in the introduction, Ices2 can read from multiple sources and send audio data to the Icecast2 server. In this article we will let Ices2 read .ogg files from the local hard disk (playlist mode), and we will install Icecast2 and Ices2 on the same system.
Ices2 supports Ogg Vorbis files only, so if you have .mp3 files that you want to stream you should convert them to .ogg. (In earlier versions Ices supported MP3 files as well, but this support was given up because MP3 is a patented and proprietary encoding technology whereas Ogg Vorbis is an open and patent-free audio encoding technology.)
In this example my system uses Debian Etch. The procedure should be identical for Ubuntu systems. My system has the IP address192.168.0.100.

2 Install And Configure Icecast2

To install Icecast2 we simply run
apt-get install icecast2
Afterwards we must edit /etc/icecast2/icecast.xml. Most default values should work fine for now, but you should change the passwords in the ... section. The source-password is the password that Ices2 will later on use to connect to Icecast2; the admin-password is the password that the admin will use in Icecast2's web interface; we won't use the relay-password, but anyway you should change it.
vi /etc/icecast2/icecast.xml
[...]
    
        
        password1
        
        password2

        
        admin
        password3
    
[...]
Afterwards edit /etc/default/icecast2 and set ENABLE to true:
vi /etc/default/icecast2
# Defaults for icecast2 initscript
# sourced by /etc/init.d/icecast2
# installed at /etc/default/icecast2 by the maintainer scripts

#
# This is a POSIX shell fragment
#

# Full path to the server configuration file
CONFIGFILE="/etc/icecast2/icecast.xml"

# Name or ID of the user and group the daemon should run under
USERID=icecast2
GROUPID=icecast

# Edit /etc/icecast2/icecast.xml and change at least the passwords.
# Change this to true when done to enable the init.d script
ENABLE=true
That's it already, we can now start the Icecast2 server:
/etc/init.d/icecast2 start
You can now direct your browser to http://192.168.0.100:8000/ (replace 192.168.0.100 with your own IP address or FQDN) and browse through the web interface:

Cara Install WebUzo di Ubuntu


INSTALL WEBUZO CP ON UBUNTU 15.04 VPS


This is a step by step guide – with pics – on how to correctly install Webuzo free control panel to host websites on Ubuntu 15.04 VPS. But before we go directly to the steps, it is better to firstly get to know about what Webuzo actually is and what features this piece of software is equipped with. Read on!

ABOUT WEBUZO

Webuzo is in short can be described as a single user hosting control panel suitable for both Dedicated or Virtual Private Server (VPS). Yet, this cool control panel is also deploy-able at cloud environment. Webuzo can be easily installed on your virtual servers. It is compatible with any virtual server powered by Xen PV or HVM, KVM, OpenVZ, etc. Webuzo has so many users and fans out there because of its easy-to-use and sleek user interface. It is like cPanel without WHM.
Webuzo installation includes needed LAMP stack plus ready-to-enable LEMP / LNMP (Nginx)stack. Webuzo saves you the time and the most importantly the hassle of setting up the server, thanks to its advanced technology which is a mixed blend of all the web server software such as Apache, PHP, MySQL, Apache Tomcat, PERL, MongoDB, Python, etc. It also has administering tools like phpMyAdmin, RockMongo, etc. Webuzo serves as a complete solution to server management.
Webuzo hosting control panel is made available in several license types: Free, Cloud, VPS and Dedicated. Paid licenses are available in annually or monthly payment method while Free license is totally free with no renewal needed.
Key features of Free Webuzo CP:
  • One License per server
  • Free Webuzo Upgrades
  • Free Scripts Upgrades
  • Support related to Softaculous via the Support Forums
  • 59 scripts are included
  • No renewal is required. It can be upgraded to Premium License anytime
  • Compare Free vs Premium here.

HOW TO INSTALL WEBUZO

Webuzo can be installed on CentOS or Ubuntu, but this tutorial will guide you installing it on Ubuntu 15.04 server.
Prerequisites
  1. SSH client like Bitvise or Putty and basic knowledge about how to use it.
  2. Basic knowledge about common Unix command to SSH to your server.
  3. A server or VPS with at least 1GB of RAM (2GB or more is recommended).
  4. Make sure your server is running Ubuntu 15.04 either 32-bit or 64-bit. In this article I use a 1GB cloud server from Atlantic.net running Ubuntu 15.04 LTS.
  5. About 1 hour and 15 minutes of your time
  6. a cup of coffee or tea.
Confused on choosing which VPS provider to install Webuzo? Read my recommended VPS providers or top low end cloud server providersQuick recommendation: Digital Ocean,Atlantic.net or Ramnode.

HOW TO INSTALL

p.s: Please click any image you wish to see its larger version.
Step 1 – Login to your server as root or as user with root privilege (sudo):
login to vps via putty
Step 2 – Now you can start the process by firstly downloading Webuzo package using wget:
1
wget http://files.webuzo.com/install.sh
download webuzo package
Step 3 – Once you have it downloaded, you have to chmod (change permission attribute) that file to 755:
1
chmod 755 install.sh
chmod webuzo install file
Step 4 – Finally, issue the main command to install Webuzo:
1
./install.sh
After that the Webuzo system will automatically detect which OS version your server is running and it will then download all necessary files. The initial installation screen may look like this one :
webuzo installation ui
Step 5 – Once you’ve seen Installation Completed message, so it means Webuzo has been installed successfully. You can now open up a web browser and continue the setup process. Use given URL in the Webuzo Installer screen which is your server IP address at port 2004:
vlcsnap-2015-10-16-20h54m59s51
Step 6 – Now fill in all required fields accordingly but leave the License Key field blank.
setup webuzo
Proceed to next stage by clicking the Install button.
installing webuzo screen
Step 7 – You’ll then see in the next page a congratulation message telling that Webuzo has been successfully installed and you can now login using username and password you defined previously. You may also need to copy that message if you want.
webuzo installation finished
Step 8 – Now go ahead login to Webuzo Control Panel at port 2004
login to webuzo
Webuzo control panel home screen:
vlcsnap-2015-10-16-21h15m12s139
you can see some basic information about your Webuzo installation:
webuzo details

INITIAL WEBUZO SETTINGS

Step 9 – Now click one the Settings menu on top and the General Settings page will appear.
webuzo settings
Step 10 – Scroll down the page a bit and look for the Is VPS option. Check mark that option if you are running Webuzo on a VPS. Also doublecheck your email address making sure it is the correct one.
webuzo settings vps
Step 11 – Optionally but it may be necessary. Change your server timezone:
change date format
Step 12 – Scroll down the page again and enable USER MOD DIR so your web files can still be accessible even without a domain name (via IP).
enable usermod dir
You may also double-check other options just in case you may personally need it to be enabled / disabled. Once done, hit the Edit Settings button.
Step 13 – Now click one Software >> Scripts Requirement to make sure that all Webuzo’s included scripts are compatible with current server setup:
2015-10-16_214045
make sure you see message something like this:
2015-10-16_213834